Background
I recently refurbished an old APC SUA750. This is an older UPS which had been retired and had been sitting in storage for a while. This UPS is going to be powering network hardware in a network closet – not powering anything like a server or NAS, so it will not be feasible to monitor it via USB or Serial, but must be monitored via the network.
I’m going to be monitoring this UPS via its network management card (NMC). I happened to also have an old AP9617 NMC which I also wanted to use. It’s older, but per Schneider Electric’s documentation, the SUA750 and the AP9617 are compatible.
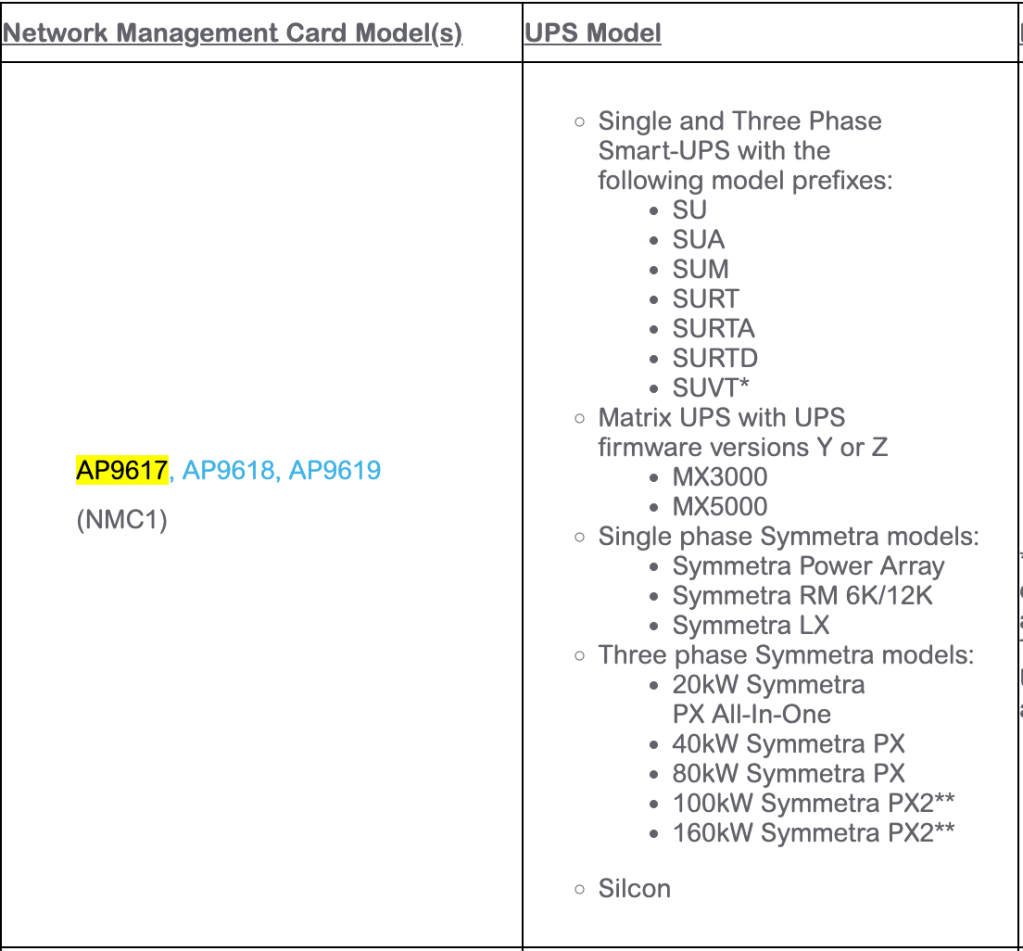
This card was from an old UPS and I didn’t have the password for it. This led me down a bit of a rabbit hole, but I was ultimately able to reset it after finding a lot of conflicting information online. The goal of this post is to show the specific settings that worked properly for me in my experience with this specific combination of hardware.
Serial for Breakfast
The AP9617 is an older generation of NMC which does not have its own serial port. The AP9630 for example has its own serial port (with its own proprietary cable / connector) that can be used to reset the NMC, but we can’t do that with the AP9617. To reset the AP9617, we need to reset it by interfacing with the UPS directly via serial. When a management card like the AP9617 is installed, the management card “takes over” the serial port of the UPS. This is important to understand for later.
APC UPSs typically have special proprietary cables. To communicate from my computer to the UPS (and ultimately the AP9617), I had to obtain the proper serial cable. The correct cable is the APC 940-0024. These and other variations (with letters appended to the end of the model number) are readily available on sites like eBay and are good to have on hand, especially if you are often working in the field on these devices.
Different serial devices use different baud rates. There was conflicting information about which baud rate to use, but initially I was trying to use the 2400 baud rate as indicated by several different blogs and forum posts. This did not work; I was not able to get any text to display. As a troubleshooting step, I tried disconnecting the NMC, and once I did that, when pressing enter, certain lines of text were displayed when using 2400 baud, which was interesting.
I later discovered that while the SUA750 UPS uses a baud rate of 2400, the AP9617 uses a different baud rate of 9600. So when the AP9617 is installed in the UPS, you have to connect to the UPS at 9600 baud.
The Reset process
To reset the NMC password:
- Connect your computer to the UPS’s serial port using the appropriate APC cable (such as a APC 940-0024D; a null modem cable won’t work)
- Open your terminal emulator and set the baud rate to 9600 baud, 8 data bits, no parity, 1 stop bit, no flow control
- Press the reset button on the NMC once. The status light will alternate between green and amber
- Press the reset button on the NMC again. You now have 30 seconds to log in using the temporary credentials
- Press enter until you receive a login prompt
- Log in using the temporary credentials: apc / apc
- Change the password of the APC account
Once I did this, I was able to log in to the AP9617 via HTTPS (that’s all that happened to be enabled) and then was able to change subsequent settings via the web UI.
Additional notes:
This NMC model is old and no longer supported. Many of the “secure” features (HTTPS, SSH) are so old and outdated that they are no longer supported by modern browsers. As such, you may need to disable them and rely on the unencrypted alternatives (HTTP and Telnet) to manage the device.
The most current version of the software is available on Schneider Electric’s website. Even though this update was released in 2021, this update still has the older NMC user interface and does not support modern encryption cipher suites. I would recommend updating to the latest version, because if your card is like mine, it was sitting in storage for quite some time and had a very old version.
Additionally, due to the lack of encryption and vendor support, I would highly recommend not using this in a production environment. If you are using this in a production environment, I recommend securing this device by putting it behind a firewall of some sort and only allowing connections to it from specific devices; this should not be accessible from your main LAN.
For reference, this is what the CLI output looked like in my terminal session:
User Name :User Name :User Name :User Name :User Name :User Name : apcPassword : ***User Name : 3.!$%+?=#|.')+-89>@ABCDEFGKLMNOPQRSUVWXYZabcefgjklmnopqrsuxyz0903.!$%+?=#|.')+-89>@ABCDEFGKLMNOPQRSUVWXYZabcefgjklmnopqrsuxyz0903.!$%+?=#|.')+-89>@ABCDEFGKLMNOPQRSUVWXYZabcefgjklmnopqrsuxyz090------- Control Console ------------------------------------------------------- 1- Device Manager 2- Network 3- System 4- Logout <ESC>- Main Menu, <ENTER>- Refresh, <CTRL-L>- Event Log>------- Control Console ------------------------------------------------------- 1- Device Manager 2- Network 3- System 4- Logout <ESC>- Main Menu, <ENTER>- Refresh, <CTRL-L>- Event Log> 3------- System ---------------------------------------------------------------- 1- User Manager 2- Identification 3- Date/Time 4- Tools 5- RADIUS 6- Modem 7- About System <ESC>- Back, <ENTER>- Refresh, <CTRL-L>- Event Log> 1------- User Manager ---------------------------------------------------------- 1- Administrator 2- Device Manager User 3- Auto Logout : 3 Minutes 4- Accept Changes : <ESC>- Back, <ENTER>- Refresh, <CTRL-L>- Event Log> 1------- Change Administrator Passwords ----------------------------------------- Current Administrator user name : apc Enter new Administrator user name <ENTER> to skip : Enter new Administrator password <ENTER> to skip : *** Confirm new Administrator password : *** Password has been changed successfully. Enter new Administrator authentication phrase, Minimum 15 characters <ENTER> to skip : Press <ENTER> to continue...------- User Manager ---------------------------------------------------------- 1- Administrator 2- Device Manager User 3- Auto Logout : 3 Minutes 4- Accept Changes : <ESC>- Back, <ENTER>- Refresh, <CTRL-L>- Event Log> 4------- User Manager ---------------------------------------------------------- 1- Administrator 2- Device Manager User 3- Auto Logout : 3 Minutes 4- Accept Changes : Success <ESC>- Back, <ENTER>- Refresh, <CTRL-L>- Event Log>------- System ---------------------------------------------------------------- 1- User Manager 2- Identification 3- Date/Time 4- Tools 5- RADIUS 6- Modem 7- About System <ESC>- Back, <ENTER>- Refresh, <CTRL-L>- Event Log>------- Control Console ------------------------------------------------------- 1- Device Manager 2- Network 3- System 4- Logout <ESC>- Main Menu, <ENTER>- Refresh, <CTRL-L>- Event Log> 4You are now in passthru mode.

